
No matter which one you have problems with, a freewheel or a freehub, the reason it stops engaging is always the grease or oil inside being old and dry. Pawls that engage the wheel simply get stuck, and you are unable to get the bike going. This usually happens when the bike is not ridden very often.
How to fix freewheel or freehub not engaging
One option is to take the freewheel or the freehub apart, get all the pawls moving, and rebuild it with new grease or oil. The second method is to pour some mineral or other low-density oil through the gaps and keep rotating until everything starts working again. This is a less permanent way of fixing it, and the problem is likely to return in time. The last option is to replace the whole part with a new one.
Now that I’ve given you the short answer, it’s time to go into specifics. A bit more detailed explanations are important because some freehubs and freewheels are not that simple. That means unless you already know how they are put together inside, or you have something or someone to guide you through, you won’t have much luck repairing them.
What Is The Difference Between Freewheel And Freehub?
When talking about differences, the main thing to understand is that a freehub is a separate part of the cassette cogs. It’s a more advanced system than a freewheel and is generally used on almost any bike today. However, depending on the type of wheel axle, cassette type, or even the hub manufacturer, there are several different freehub types. Details about important freehub differences later on…
Freewheel, on the other hand, is the same rotational clutch system but already built with chainrings. We can usually find it on low-end bikes with single speed, 5-speed, 6-speed, or 7-speed freewheels.
How does a Freehub work?
A freehub is a ratcheting mechanism that provides free rotation in one direction and engages the wheel using pawls and teeth in the other. Pawls fold into the rotational body of a freehub when pedaling backward. Basically, they fold to create a smooth circle that can rotate freely in that direction. There is a spring beneath each pawl that pushes them out to lock onto the teeth of a fixed part of a freehub. When they lock, the drivetrain engages the wheel, and the bike gets moving.
The same goes for freewheels; it’s just placed a bit different on some of them.
Why Do Pawls Stop Engaging With Time?
As I’ve already said, it’s always about grease or oil, depending on which one is used. Even if the pawl gets jammed and breaks, it’s because it wasn’t greased properly. This usually happens if the bike isn’t ridden very often, especially if it just sits in a garage somewhere. Grease will get dense in time and won’t do its job anymore. The same goes for oil as it gets dry and sticky.
If the bike is ridden all the time, the heat that comes from rotational friction keeps the grease and oil light and thin so it can do what it is made to be doing.
What’s even worse, if the grease or oil becomes dense, metal parts are left unprotected from moisture, and oxidation or rust kicks in and gets pawls stuck.
Types of Freehubs
As mentioned above, there are different types of freehubs that we need to know before fixing them. Differences regarding cassette types are irrelevant for this post; however, adaptations for different hub and axle types really make a difference. The important thing to point out is that there are internal and external pawls.
Internal pawls are usually found on lower-end freehub bodies made for hubs with loose ball bearings. They are a bit more difficult to repair as you need to take the whole freehub apart to get to pawls. Not only that but loose ball bearing axles take a bit more time and mess-making to take out and reach the freehub locknut.
External pawls are the best thing the bike industry made in terms of servicing bicycles. They usually overcomplicate things to force you to buy expensive tools, and so on, but in this case, they made it really simple. External pawls mean you only need to take the axle off, which in this case, is really easy to do. These types of freehubs are found on closed bearing hubs, made for thru-axle systems where the axle is only attached to the hub by unthreaded end caps, which you can pull off in a second.
Some older/cheaper types use threaded axles, but it’s still by miles easier to take off the hub than those QR axles. Once you do that, the freehub sits on the hub without being attached by a thread. The external pawls lock onto the hub’s teeth, making them really easy to get to and service.
Grease or Oil for Freehub Service?
Most manufacturers recommend using low-density oil. Some even have their own product specifically made for freehubs, like Dumonde Tech Freehub Oil.

- Recommended Use: oiling your bikes freehub
- Specifically designed for Pawl style freehubs which require a lightweight lubricant
- Flow point is -40 degrees
- Extremely low friction, providing the greatest protection
- Performs consistently throughout a wide temperature ra
Prices pulled from the Amazon Product Advertising API on:
Product prices and availability are accurate as of the date/time indicated and are subject to change. Any price and availability information displayed on [relevant Amazon Site(s), as applicable] at the time of purchase will apply to the purchase of this product.
I’m always using mineral brake fluid from Shimano. It works perfectly because it’s low-density oil, which is incompressible and highly resistant to no matter what it’s exposed to. That means it will keep lubricating pawls for a very long time.
I would recommend using oil, but I wouldn’t say the grease is necessarily bad for freehubs. I’ve used it before, and as long as it’s high quality and not too dense, it works alright, except maybe not for as long as servicing with oil.
How to Repair Freehubs and Freewheels
How to Repair External Pawl Freehubs
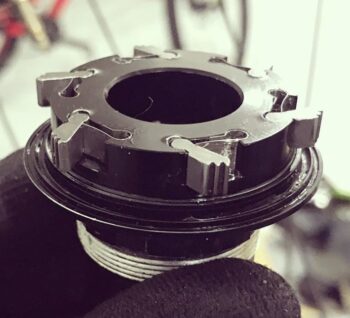 Open pawl freehubs are my favorite to repair. You can always replace the pawls, sealed bearings are easy to check and replace, and the whole system is made to be easily lubricated or greased.
As I’ve already mentioned above, how to get this type of freehub off the hub, it’s time to repair it. If the hub isn’t engaging, then your job is easy. All you need to do is check each pawl’s movement. If the pawl doesn’t protrude back after you push it against the freehub body, it’s one of two things.
In the first case, the pawl is either getting stuck because it is poorly lubricated or permanent rust damage, which is quite rare. You can use a drop or two of Dumonde Tech Freehub Oil to get it moving again.
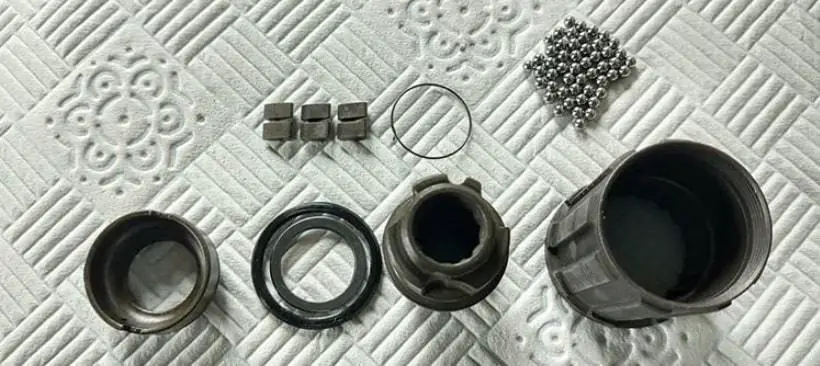
A more thorough way of doing it covers all the possible problems in the second case. Some freehubs require taking an o-ring off before you can remove the pawls. If that’s the case, small pliers or a pick can do that easily. Once you’ve done that, just carefully extract the pawl from its place while making sure the spring doesn’t fly away. The spring is quite tiny and fragile, so I always make sure the spring itself isn’t damaged. The pawl should be cleaned with a degreaser like Park Tool CB-4 Bio Chainbrite Bicycle Chain & Component Cleaning Fluid and completely dried afterward. If it’s damaged, you can order a replacement set online for most of the freehub manufacturers. Some of them are even interchangeable.
When placing the pawls back, use only a bit of lubricant while assembling it. It will be easier to put the spring in place. Once everything is put back together, I like to put a few drops more on the pawls and the gaps beneath them.
How to Repair Internal Pawl Freehubs
The easy method which I mentioned at the beginning of the article works 99% of the time. Take the axle and the freehub off the wheel. Some freehubs use 11mm non-standard hex wrench, but most of them are either a 10 or a 12mm. Once it is off the hub, take the rubber washer off from the side of the wheel. Once you take it off, you should be able to see the bearings. You can inspect how dirty or dry they are because the pawls are just beneath them inside, so they are probably in the same condition.
If the inside looks dirty from old grease, I usually dip the whole freehub body into Park Tool CB-4 Bio Chainbrite Bicycle Chain & Component Cleaning Fluid for an hour or two. When I take it out, I rotate it a bit and let it dry. Always put it vertically to allow the degreaser to drain out of the freehub body. It usually takes more than 4 hours to make sure there isn’t any degreaser left inside. Now pour some Dumonde Tech Freehub Oil or mineral brake fluid from Shimano onto those bearing and rotate the freehub until it’s working really nice. You will notice less resistance on the rotation and better and better clicking noise. You don’t need to play it safe with the oil. In this case, feel free to flood it completely and let some drain on the other side.
Once you are satisfied with how it’s working, wipe off the excess oil on the outside. Now, a trick I like to use is pushing just a bit of grease on top of those inner bearings before putting the rubber washer back on. I don’t push it between the bearings, just on top of them, to seal the freehub body even better. It will double its functionality by preventing oil from drying or absorbing water (which is another reason I like mineral oil for this).
Put everything back on the hub, and you are good to go.
Why Don’t I Recommend Taking the Freehub Apart?
First of all, the chance that the method above won’t work is so small that if it actually comes to that, the freehub is most likely so much damaged that it isn’t even worth repairing.
Second of all, even if you find a wrench to get the counter-clockwise threaded cone open, it’s a nightmare to put back together. There are 25 tiny bearings on each side, some spacers, and pawls. If any of it is damaged or lost, you need to replace them. However, the probability of finding proper pawls or spacers selling anywhere is minimal.
When I take all fo that into account, it’s much easier to get a new freehub, a hub, or a complete wheel if the easy method doesn’t work.
How to Repair a Freewheel
Like with internal pawl freehubs, I don’t recommend wasting time on opening it. 66 bearings that are inside are even more difficult to assemble than those 50 in freehubs.
However, I prefer doing the same easy method as with freehubs. Dump the freewheel into Park Tool CB-4 Bio Chainbrite Bicycle Chain & Component Cleaning Fluid, dry it completely, and lubricate it back with Dumonde Tech Freehub Oil. Here, the only difference is it is a bit more difficult to put the oil inside since the gaps are really tight, and there are no rubber seals to remove. In the end, it only takes a bit more time.
For more detail, check the “How to Repair Internal Pawl Freehubs?” part and apply the same method.
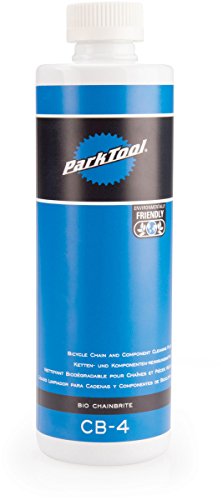
- CB-4 Bio Chain rite is a 100% biodegradable, natural, plant-based degreaser
- It removes the toughest grease and grime build up from chains and bicycle components
- Bio Chain rite is also an excellent general purpose bicycle degrea
Prices pulled from the Amazon Product Advertising API on:
Product prices and availability are accurate as of the date/time indicated and are subject to change. Any price and availability information displayed on [relevant Amazon Site(s), as applicable] at the time of purchase will apply to the purchase of this product.